- If the paper is curled, straighten it and then put it back in the paper tray.
- Use regular paper or thin paper. Do not use bond paper.
1. You can either set the duplex/booklet print for a single job, or set the driver for so that all subsequent print jobs are duplex/booklet printed.
a. Within the application you wish to print from select the print option.
b. Click PROPERTIES to open the Printing Preferences window. Continue to STEP 2.
NOTE: The steps may vary depending on your application.
a. Open the Printer Folder:
Windows XP or Server 2003:
- Start => (Settings) => Control Panel => Printers (and Faxes)
- Start => Control Panel => Printers and Other Hardware => View Installed Printers
Windows Vista or Server 2008:
- Click Start => Control Panel => Hardware and Sound => Printers.
Windows 7 or Server 2008 R2:
- Click Start => Control Panel => Hardware and Sound => Devices and Printers
b. Right-click on the Brother Printer and select Printing Preferences. Continue to STEP 2.
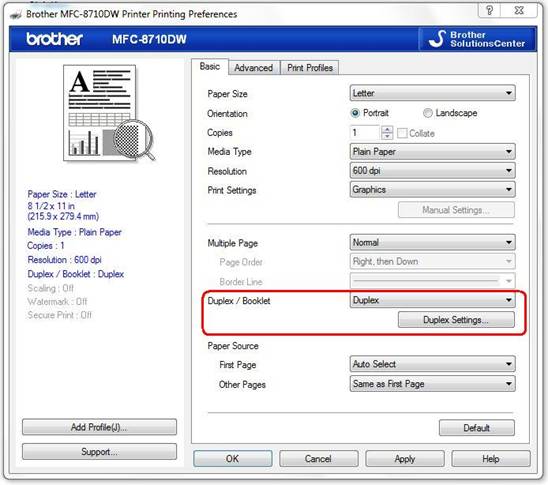
2. On the Basic Tab, make one of the following selections from the Duplex/Booklet dropdown box:
- None: When you want to print on one side, choose this item.
- Duplex: When you want to print on both sides of the paper automatically, choose this item.
- Booklet: When you want to print as a booklet automatically, choose this item. To make the Booklet, fold the printed pages down the middle. When using the booklet printing function, please note that the paper size, orientation, source and other settings must remain unchanged for the whole document.
3. Click the DUPLEX SETTINGS button.
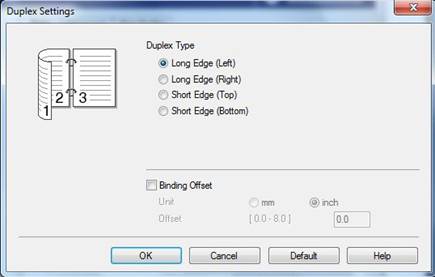
4. Depending on whether you selected Duplex or Booklet, you may adjust the following settings:
DUPLEX PRINTING:
- Duplex Type: There are four (4) types of duplex binding directions available for each orientation - Portrait or Landscape.
- Binding Offset: If you check this option, you can also specify the offset for the binding in inches or millimeters.
BOOKLET PRINTING:
- Duplex Type: There are two (2) types of duplex binding directions available for each orientation - Portrait or Landscape.
- Booklet Printing Method: When Divide into Sets is selected: This option allows you to fold at the center of the smaller individual booklet sets without having to change the order of the page number. You can specify the number of sheets in each smaller booklet set, from 1 to 15. This option can help when folding the printed booklet that has a large number of pages.
- Binding Offset: If you check this option, you can also specify the offset for the binding in inches or millimeters.

5. Click OK.
6. Click (APPLY) => OK.
7. If printing a Single Job, click OK or PRINT in the print dialog box to begin the print job.
If configuring for All Jobs, the driver is now configured and all subsequent print jobs will use the selected settings.
When duplex printing:
- When printing on Ledger or B4 paper, duplex prints will be 0.8 in. smaller at the top and bottom of the original.
- If the paper is curled, straighten it and then put it back in the paper tray.
- Use regular paper or thin paper. Do not use bond paper.
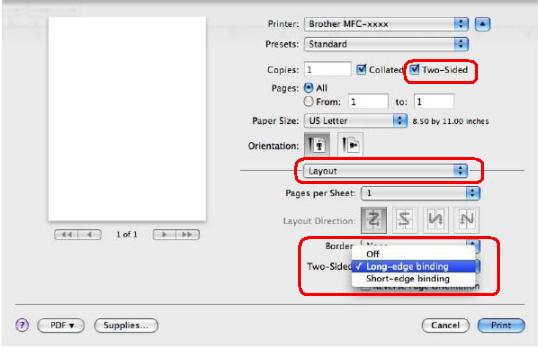
1. Within the application you wish to print from select the print option.
2. In the Print dialog box, to the right of 'Copies' select Two-Sided.
3. From the Application dropdown, select Layout.
4. From the Two-Sided dropdown, select Long-edge binding or Short-edge binding.
5. To save this preference for future Duplex printing:
6. Click PRINT. The document will print with the selected options.